

Keeping your hedge trimmer blades sharp is important. Sharp blades cut better and work safely. When blades get dull, trimming bushes becomes hard. The machine may pull or tear branches. This can hurt plants and waste your time.
Sharpening hedge trimmer blades is not hard. You can do it at home with some simple tools. This guide will show you how. Follow each step carefully. Your trimmer will work like new again.
Why Sharpen Hedge Trimmer Blades?
- Better cutting: Sharp blades make clean cuts on branches.
- Save time: You finish trimming faster with sharp blades.
- Less effort: The trimmer works smoothly and does not get stuck.
- Protect plants: Clean cuts help plants heal faster.
- Longer tool life: Sharpening helps the blades last longer.
What You Need to Sharpen Hedge Trimmer Blades
Before starting, gather the tools and materials. Here is what you need:
| Item | Purpose |
|---|---|
| Safety gloves | Protect your hands from sharp blades |
| Eye protection (goggles) | Keep your eyes safe from metal filings |
| Flat file or diamond file | Sharpen the cutting edges of blades |
| Wrench or screwdriver | Remove blades if needed |
| Cleaning cloth | Remove dirt and oil from blades |
| Lubricating oil | Keep blades smooth after sharpening |
| Brush (small wire brush) | Clean rust and dirt from blades |
Step 1: Prepare Your Hedge Trimmer
First, unplug the trimmer or remove the battery. Safety is very important. You do not want it to start by accident.
Wear safety gloves and goggles before touching the blades. Blades can be sharp and dangerous.
If your blades are very dirty, use a brush to clean them. Remove all leaves, dirt, and rust. Wipe the blades with a cloth.
Step 2: Inspect the Blades
Look closely at the blades. Check for any damage like cracks or broken teeth. If blades are badly damaged, you may need to replace them.
If blades are only dull, you can sharpen them. Look for small nicks or dull edges.
Step 3: Remove the Blades (Optional)
Some people like to sharpen blades while still on the trimmer. Others prefer to remove them.
Removing blades makes sharpening easier and safer. Use a wrench or screwdriver to take blades off. Keep all screws and parts safe.
Credit: www.japanesetools.com.au
Step 4: Secure the Blade
If blades are off the trimmer, place them on a stable surface. You can use a workbench or table.
Use a clamp to hold the blade steady. Do not hold it with your hand while filing. This keeps you safe.
Step 5: Sharpen the Blades
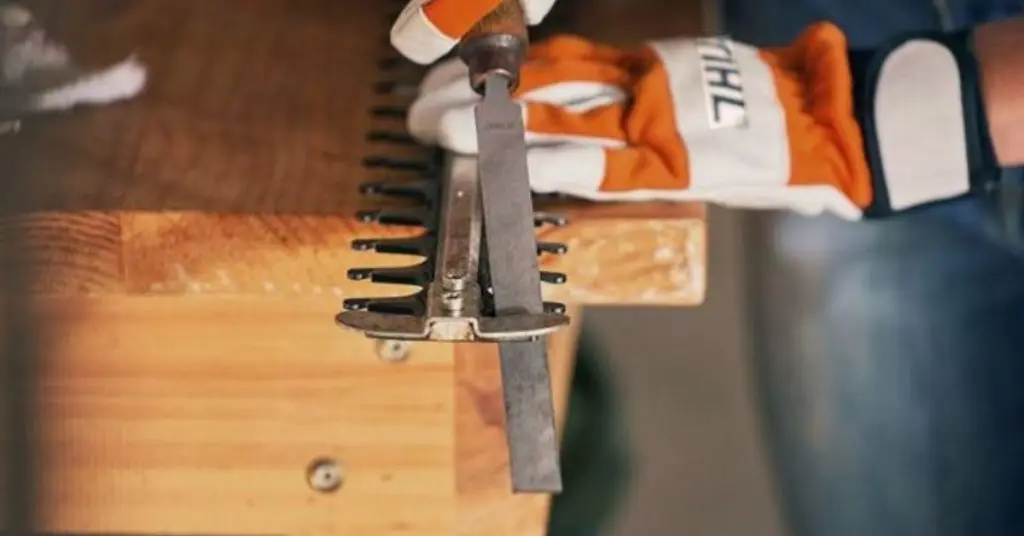
Take your flat file or diamond file. Hold the file at the same angle as the blade edge. Usually, this is about 30 degrees.
File the blade gently in one direction. Do not file back and forth. Use smooth, even strokes from the base to the tip.
Sharpen each blade tooth or edge the same way. Make sure to keep the angle consistent.
Count about 5 to 10 strokes per edge. Check the blade after each few strokes. Stop when the edge looks sharp and smooth.
Step 6: Remove Burrs
After sharpening, you may see tiny metal burrs on the blade edges. These are rough bits that can catch on plants.
Use a finer file or a sharpening stone to remove burrs. Rub the stone gently along the blade edge.
Step 7: Clean and Oil the Blades
Wipe the blades with a clean cloth to remove metal dust. Then, put a few drops of lubricating oil on the blades.
Oil helps blades move smoothly. It also protects them from rust.
Credit: www.vevor.com
Step 8: Reinstall the Blades
If you removed the blades, put them back on now. Use the screws and tools to fix them tightly.
Make sure blades move freely but do not wobble.
Step 9: Test the Hedge Trimmer
Plug in or reattach the battery. Turn on the trimmer carefully. Listen for smooth sounds without grinding or shaking.
Try cutting a small branch. The trimmer should cut cleanly and easily.
Tips for Keeping Blades Sharp Longer
- Clean blades after each use.
- Oil blades regularly to stop rust.
- Trim branches that are not too thick.
- Store the trimmer in a dry place.
- Sharpen blades at least once a season.
Safety Reminders
- Always wear gloves and eye protection.
- Keep blades away from children.
- Unplug or remove battery before working on blades.
- Do not rush. Take your time to sharpen carefully.
Summary
Sharpening hedge trimmer blades helps your tool work well. It saves time and protects your plants. You only need some basic tools and safety gear.
Follow these steps: prepare, inspect, remove blades (if you want), secure, sharpen, remove burrs, oil, reinstall, and test. Keep blades clean and oiled for best results.
With care, your hedge trimmer will cut like new. Happy trimming!
Frequently Asked Questions
How Often Should I Sharpen Hedge Trimmer Blades?
Sharpen hedge trimmer blades after every 10 to 15 hours of use. Dull blades cut poorly and can damage plants. Regular sharpening keeps your trimmer efficient and safe.
What Tools Do I Need To Sharpen Hedge Trimmer Blades?
You need a flat file, sharpening stone, or a rotary tool with a grinding attachment. Safety gloves and eye protection are also important. These tools help you sharpen blades precisely.
Can I Sharpen Hedge Trimmer Blades At Home?
Yes, sharpening blades at home is simple and cost-effective. Follow a step-by-step guide and use the right tools. Regular home sharpening extends blade life and improves cutting.
How Do I Know If Hedge Trimmer Blades Need Sharpening?
Blades that tear or crush branches instead of cutting need sharpening. If your trimmer struggles or slows down, the blades are dull. Checking blades regularly helps maintain sharpness.